Ports and Connectors
Contents
Front Panel
RCA Line In
These are standard RCA Line-In jacks, 2v P-P nominal.
Headphone Jack
Standard 1/8" stereo headphone jack.
SD Card
Standard SD Card slot using custom controller logic instantiated on an FPGA.
Joystick Ports
The joystick ports, from left to right, are numbered 0,1,2,3.
- Ports 0 and 1 may be electrically configured as 12 bit (S)NES style ports or as basic ATARI/Commodore with no support for paddles or analog joysticks.
- Ports 2 and 3 (FMX only) are ATARI/C64 style ports and include analog inputs.
| DB9 | 0-1 (S)NES | 0-1 TTL | 2-3 ATARI/C64 |
| 1 | ignored | UP | UP |
| 2 | ignored | DOWN | DOWN |
| 3 | ignored | LEFT | LEFT |
| 4 | ignored | RIGHT | RIGHT |
| 5 | LATCH | Button 1 | POT-Y |
| 6 | DATA | Button 0 | BUTTON |
| 7 | +5 | +5 | +5 |
| 8 | GND | GND | GND |
| 9 | CLK | Button 2 | POT-X |
Reset Switch
"Power" LED
The power LED is under software control.
Rear Panel
Power Switch
Just an ordinary rocker switch.
Power
The power connector is a 12v center-positive 2.5mm barrel connector. The bare board should operate on as little as 500ma, but you should plan on more like 3A to cover adding a floppy drive, hard drive, etc.
PS/2 Keyboard and Mouse
- PS/2 port 0 (Purple) -- nominal keyboard port
- PS/2 port 1 (Green) -- nominal mouse port
DVI-I
The Video connector is DVI with digital and analog output suitable for use with passive VGA and HDMI adaptors.
Parallel Port (FMX)
IBM Standard DB25 EPP
Serial Port
The serial port on the U/U+ is a minimal 3-pin implementation. The serial port on the FMX is fully implemented.
MIDI (FMX)
- The port on the left (closest to the serial port) is MIDI OUT.
- The port on the right (closest to the RCA jacks) is MIDI IN.
Line Out
These are standard RCA Line-Out jacks, 2v P-P nominal.
Internal
J2 (Serial)
The 8-pin serial header follows the DTK/INTEL standard:
- https://pinoutguide.com/Motherboard/rs232_header_pinout.shtml
- https://wiki.c256foenix.com/index.php?title=File:FMX_internal_serial_Header.jpg
P2 (IDE)
Standard 44 Pin 2.5" laptop HDD IDC header.
J-TAG
Standard 10-pin J-TAG connector for reprogramming the FPGAs.
FLOPPY0 and FLOPPY1
FLOPPY0 and FLOPPY1 are electrically standard 3.5" micro Floppy Disk Drive connectors (26 pins FPC Cable).
- The internal drive is expected to be connected to FLOPPY0.
CN1
J-TAG interface for programming the TRINITY and UNITY FPGAs.
Side Panel
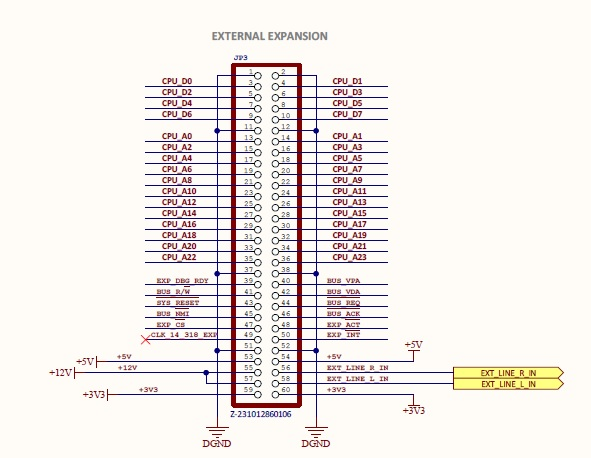
Expansion Connector
| Odd | Description | Even | Description |
| 1 | GND | 2 | GND |
| 3 | CPU D0 (I/O) | 4 | CPU D1 (I/O) |
| 5 | CPU D2 (I/O) | 6 | CPU D3 (I/O) |
| 7 | CPU D4 (I/O) | 8 | CPU D5 (I/O) |
| 9 | CPU D6 (I/O) | 10 | CPU D7 (I/O) |
| 11 | GND | 12 | GND |
| 13 | CPU A0 | 14 | CPU A1 |
| 15 | CPU A2 | 16 | CPU A3 |
| 17 | CPU A4 | 18 | CPU A5 |
| 19 | CPU A6 | 20 | CPU A7 |
| 21 | CPU A8 | 22 | CPU A9 |
| 23 | CPU A10 | 24 | CPU A11 |
| 25 | CPU A12 | 26 | CPU A13 |
| 27 | CPU A14 | 28 | CPU A15 |
| 29 | CPU A16 | 30 | CPU A17 |
| 31 | CPU A18 | 32 | CPU A19 |
| 33 | CPU A20 | 34 | CPU A21 |
| 35 | CPU A22 | 36 | CPU A23 |
| 37 | GND | 38 | GND |
| 39 | EXP_RDY (I) | 40 | BUS_VPA (O) |
| 41 | BUS_R/Wn (O) | 42 | BUS_VDA (O) |
| 43 | SYS_RSTn (OC) | 44 | BUS_REQn (OC) |
| 45 | BUS_NMIn (OC) | 46 | BUS_ACKn (O) |
| 47 | EXP_CSn (O) | 48 | EXP_ACTn (OC) |
| 49 | EXP_CLK(O) | 50 | EXP_INTn(I) |
| 51 | GND | 52 | GND |
| 53 | +5V | 54 | +5V |
| 55 | +12V | 56 | EXP_LINE_IN_R (IA) |
| 57 | +12V | 58 | EXP_LINE_IN_L (IA) |
| 59 | +3V | 60 | +3V |
(I/O) : Input/Output
(I) : Input
(O) : Output
(OC) : Output Collector (Wired Or) Bring down with OC Driver
(IA) : Input Analog (Audio Signal Input - Line Level)
Special Signals
- EXP_RDY: This is the ready Line that will hold the bus thus stretching the cycle to allow slower devices to respond. Set to 1 to add delay, 0 for normal operation.
- EXP_CSn: This is the Chip Select for the Expansion Card Zone: $AE:0000 - $AE:FFFF - for Compatibility reasons any I/O Card ought to be mapped into this area unless it requires more memory mapping.
- EXP_ACTn: Bring this signal to ground for an expansion card to be recognized by the system.
Power Allocation per Rail
+3V3: Please don't use more than 500mA for the +3.3Volt Rail.
+5V: Please don't use more than 500mA for the +5Volt Rail. The system doesn't use a lot of +5V, but there are spurious needs for +5V rail when an HDD (spinning) is installed in the system.
+12V: The limit of current you can draw on the +12V is related to the power supply you are using for your machine. It is better to use that power supply to derive any other from.


